Getting Started with Alfresco ADF Component
August 29, 2018
ADF framework is based on an angular framework and in angular applications, everything is built as ADF component like a dashlet or a page or sections of a page etc. There are in-built ready to use components are available like Card View component, Content Action component and DataTable component etc. You can create your custom ADF component which may use these inbuilt components or your custom ADF components or services, Let’s get started with how to create a custom component in ADF.
Pre-requisite:
1) Install Alfresco 5.2, APS 1.9, ADF 1.9, nodeJS 8.6.0 and angular 4
2) Execute these commands to create an alfresco app: npm install yo, npm install generator-ng2-alfresco-app
3) Create an ADF APP using command: yo ng2-alfresco-app student-management
4) This command is like a wizard in which you need to answer questions related to your application.
Let’s create a component which takes input student details and calls alfresco REST api using http request to store details in alfresco repository.
Steps to create a component:
1) Introduction of files/folder required for a component:
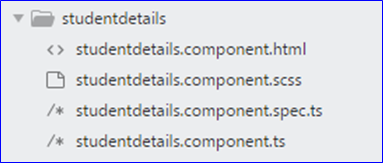
1.0 files/folder required for a component
1.1) HTML file: This is the template file of our custom ADF component. This file is optional.
1.2) SCSS file: This is the scss style file of our custom ADF component. This file is optional. There could be 0 or many scss files for define the style for our html elements.
1.3) Spec file: This is used for testing purpose only.
1.4) Typescript file:
Superset of JavaScript like classes, interface or types. Allows writing robust code because it first compiled and converted into JavaScript and then the JavaScript file executes. We mostly don’t specify any data type of a data member because of angular sets data type of data members at run-time, it reduces the possibilities of type cast exception at run-time. By default the typescript file contains following details:
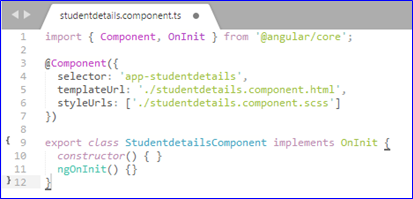
1.4 Define a custom ADF Component
In a typescript, we can define a component as shown in the above image.
At line 1: we are importing Component and OnInit decorators from @angular/core module available inside your node_modules folder.
At line 3: the @Component decorator specifies that the class defined at line 9 is not just a regular class it is a component which has some metadata attributes which describes how the component should behave at run-time.
At line 4: Selector: selector is a unique string value across the whole application. Using the selector value we can call this component from a template file otherwise we need to call this component using a route URL. The selector is CSS selector that identifies this component in a template following are the possible values for selector:
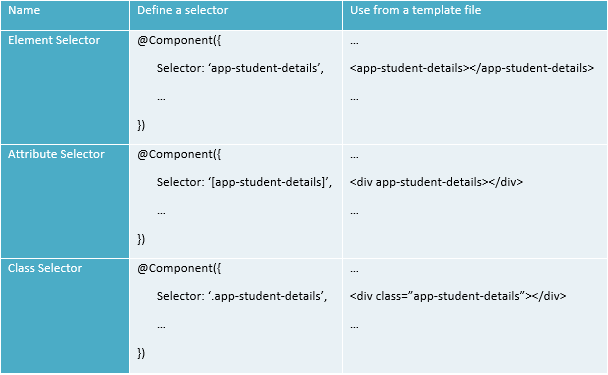
1.4 table of values of selector in a .ts file
At line 5: There are two attributes to define our template view, shown as follow:
templateUrl: Define an external template file path for the view of this component.
temple: Define an inline template for the view of this component. If it is only a single line then enclose with ‘’ else enclose your template code using “.
At line 6: There are two attributes to define our styles, shown as follow:
styleUrls: define list url of stylesheet files used for this component’s view comma separated.
styles: define inline css for this components view in this attribute using “ symbol.
At line 7: define a class for this component:
Once the @component decorator is defined then you can define a class based on their scope(import or export). The class has a constructor, data members and other methods like: referenced in html or methods of imported class.
2) Create component:
There are 2 ways to create a component. manual or using the command.
2.1) Manually:
First, you need to create a file/folder structure as shown in image 1.1. After that based on your requirement put data into HTML, CSS or spec file and in typescript file, you must declare a component as shown in the image 1.4.
2.2) Using the command:
Go to your ADF app directory and write the following command in CMD:
ng g c COMPONENT_NAME
ng -> stands for angular. All the directives build using angular are prefixed with ‘ng’.
g -> stands for generate or create component
c -> stands for component create a new component inside your adf app directory.
COMPONENT_NAME: will create a folder of COMPONENT_NAME and some required files like ts, HTML, Spec and CSS files for your component with some inbuilt data.
for example: ng g c studentDetails
Note: The only difference between these two approaches is when you create a component using cmd prompt then along with files creation it will also creates a component in side ts file. which can be used directly but when you create a component manually then you need to create a component inside ts file.
3) Import component to a module:
A custom ADF component can be called from other components if it is part of any module of your application. For this example I’m importing the studentDetails component in “app module”. let’s register our custom ADF component:
3.1) adf-app\src\app\app.module.ts: in the above import section import your custom ADF component shown as follows:
import { StudentdetailsComponent } from ‘./studentdetails/studentdetails.component’;
3.2) Then inside @NgModule decorator attributes are like:
declarations: must add your custom class name to your component by comma separated in this array.
imports: if you want that this component must be available where ever your app module is used, then only specify your component inside this array as well.
4) Call alfresco REST api using http:
Alfresco DF can fetch data from alfresco repository using RESTAPI, let’s call a people webscript to create user in alfresco repository from our custom ADF component.
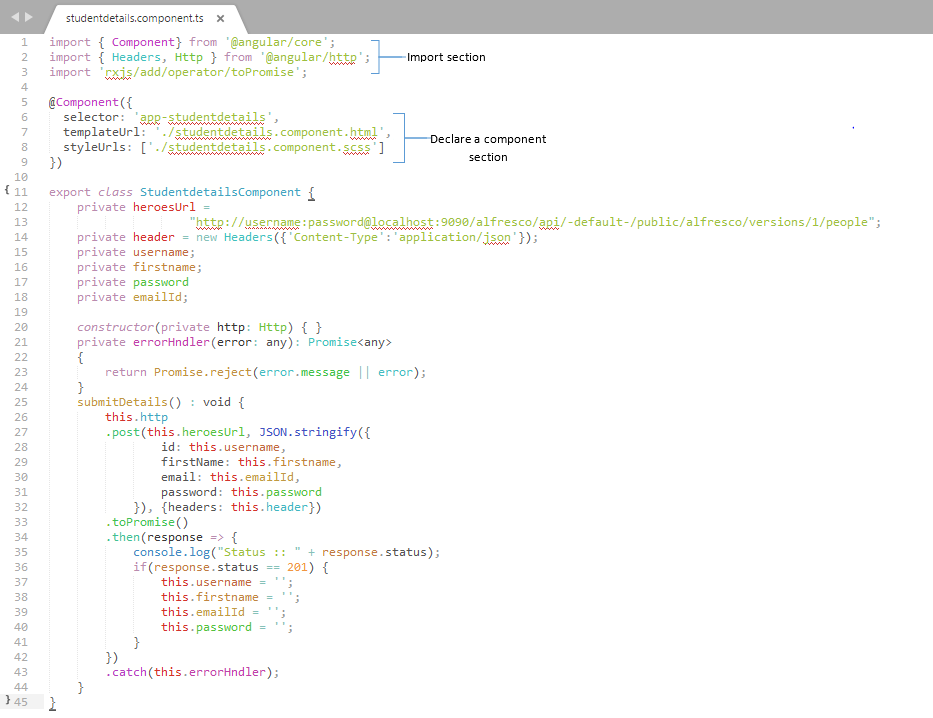
4.0 Call repository webscript
The above screenshot shows one of the way to call the repository webscript from alfresco custom ADF component using http request to alfresco repository (There are other ways also to call alfresco repository webscript like: alfrescoJSapi ). Define a httpUrl that you want to call, set the type(get, post, put, or delete) of the webscript, and pass arguments according to that. For this example I’m calling the repository webscript of people which will create a user in alfresco repository.
Note:
idle you should create a service which will call repository web scripts and our components will call the service, but this blog is meant to be focused on custom ADF components in angular so therefore I’m call repository webscript.
Following are the template and stylesheet files for our student details component:
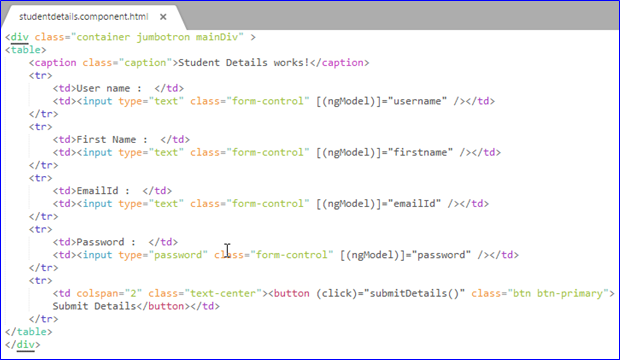
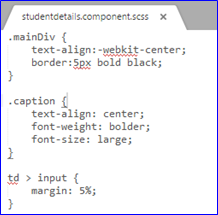
5) How to use our custom ADF component:
5.1)Use custom ADF component:
Let’s call the “app-studentdetails” selector in our app.html file at location projectDirectory/src/app/app.component.html
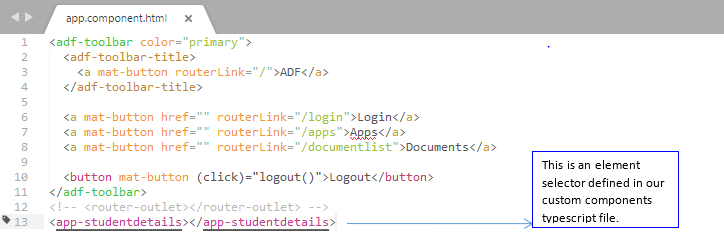
5.1 Use custom ADF component
Note: There are other ways also to call our custom ADF component like call using url or give input to your component.
6) Execute the component:
Now let’s start the server by executing following command:
npm start
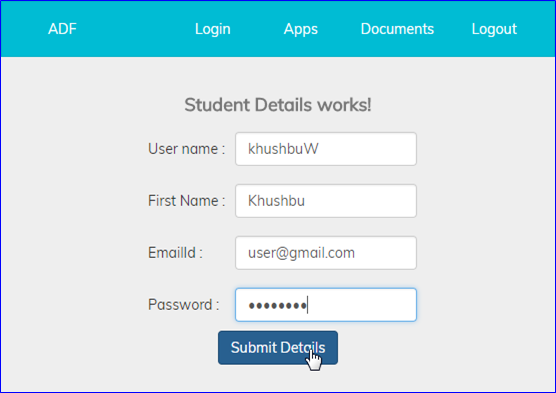
It will automatically open a new tab in google chrome with the address something like: “localhost:4200” and shows the following output.
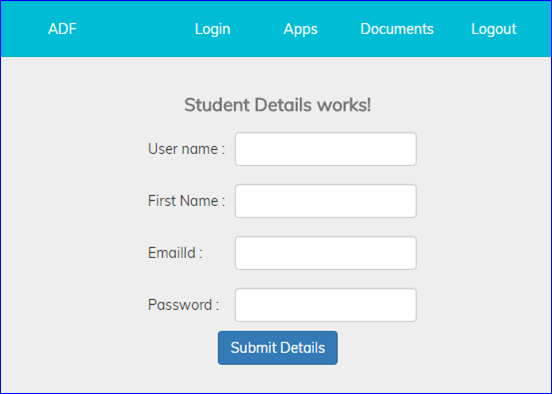
Server started and by default it is on app.html file inside which we have added our component. Let’s add student details shown as following:
Summary:
This blog shows a basic idea of how to create a component in alfresco ADF. This blog is intended for beginners of ADF to get started with custom ADF Components.
Post By,
Khushbu Watwani